The first rooftents we had were these boxy affairs, aerodynamics just wasn't important. After all, if you were driving much over 55 in your trusty Series Land Rover, you were pushing it. Today, this has all changed, when Porsche designs a truck for offroad use, aerodynamics is very important.
You can still get the boxy Maggiolina Adventures by special order. They are better suited for Africa than North America or Europe. The new Maggiolinas and Columbus rooftents are designed to be slippery, to allow you to get the best mileage and to travel at high speeds, very high speeds, think German autobahns. I was surprised by how quiet they are, much quieter than the roof racks. Seriously, bare racks are noisy, they quiet right down with a Maggiolina or Columbus on them.
Here is the shape of one of the newer tents. This is a drawing I got from Italy and it shows something interesting, the flow of air under the tent. The tents act like a big wing up there. This was confirmed by some of the guys with G-Wagons and classic Cherokees. They would tell me that they keep the tents on full time because they get better mileage.
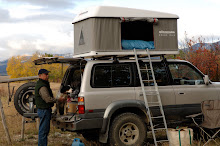
Many years ago, I used to have a big Maggiolina Adventure, full boat, as big as they come, even had a rack on top for even more stuff. This went on my old Volvo wagon, my trusty off-road vehicle at the time, and the mileage suffered. I went from a constant 22 down to 19 or 20, down at least 10%. Something was wrong, turns out you don't want a rooftent wider than your car or truck's roof, my tent was way too wide. There seems to be a funny end plate thing that goes on like at the edge of a wing. If you get a tent about the same or less width as your roof, the aerodynamics are very good. When I got a medium Columbus, still a big tent, my mileage went back up to 21 or 22.
Getting back to the air under the tent. Turns out, this is a good thing. Years back, I had to go up to Port Townsend to pick up a large table. No problem, just break it down and put it on the rack, but then I couldn't carry a rooftent. My wife will only sleep in a rooftent or a four star hotel, she is a girly girl, hates bugs and loves comfort, so without a rooftent it gets expensive. My solution was to carry two sets of racks. The tabletop would go on the low racks, and I had the Columbus on some super high bars at least a foot above the roof. My guess was that the aerodynamics would suck, but they were actually better, got 22 to 23 mpg on this trip. It was sitting up there in clear air, looked funny but worked really well. Another thing I observed, the front of the tent was clean, no bugs. If you tent is a bug collector, try moving it back if you can, seems to help.
We can discuss the aerodynamics of folding fabric rooftents in the next blog entry if anyone is interested. Let me know.
Rich H


