Monday, February 17, 2014
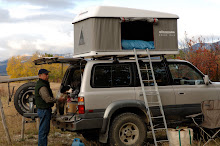
Ben Davenport - A new shelter for his journey
We enjoyed meeting Ben again and you may expect to see him around our stand at OverLand Expo in May.
Wednesday, April 4, 2012
Wednesday, November 30, 2011
Short bits of news...
CampaUSA was featured last month on Examiner.com as the best "Expedition grade" camping trailer in the world. Congratulations to Chris Cole, Anne Pence and the team at CampaUSA! Check out the link...World's Best Expedition Grade trailer
Another bit -- we have a huge shipment of tents arriving at the warehouse on December 15th. Some are pre-sold, but many will be available. Get your order in now!
Best wishes for the Holiday Season!
Mike
Tuesday, June 21, 2011
Introducing Greg Galuppo
At this time of year the phones can get very busy, and some people have difficulty getting through to us. Accordingly, we have beefed up our sales team.
Greg Galuppo has joined AutoHomeUSA and will be manning the phones so that we can serve you better and attend to all the other tasks of running the business.
Greg is an enthusiastic camper and California native who was born and raised on the Monterey Peninsula, and now resides in the rolling foothills of the Sierra Nevadas. A year-round outdoor enthusiast, Greg is also an accomplished amateur road/mountain bike and cyclocross racer, and dual-sport/adventure-bike enthusiast (BMW 650cc).
"Most weekends you will find me up in the Sierras, usually taking the road less traveled. Living in California affords me with endless possibilities for outdoor adventures, and the Maggiolina Airlander is the perfect travel companion when you want to get away from it all. Feel free to contact me with any questions you might have about any of our fine products...I'm happy to help you out!"
Greg drives a Toyota T100 with a Maggiolina AirLand on a Thule Xsporter rack system.
Monday, March 28, 2011
Off to OverLand Expo
OverLand Expo has become the leading gathering place for overlanders from around North America and from all over the world. We hop to see you there!
Wednesday, January 26, 2011
Monday, November 15, 2010
Winter shipment on the way!
I've been using the new Air Top for about a year now and I like the extra interior space, easy opening, and the rear door. It's become my favorite of the Maggiolina models.
Saturday, July 17, 2010
Campa USA builds a campa'
For me the obvious choice was a Maggiolina roof-top tent. Being tall, I elected to get the longer version in the medium width size. I have used Maggiolina’s before in various climatic conditions and, in my opinion, there is no tent that compares favorably. The design, simplicity of deployment and comfort combine to provide an unparallel sleeping quality in all weather conditions. The sleek low profile, I believe actually IMPROVES fuel consumption.
I elected to mount the Maggiolina “backwards” with the larger part facing forward. The logic behind this was that fuel efficiency with regard to “wind” consists of two elements; the first element is the frontal area of the vehicle that must be pushed through the air, the second element is the drag [drag coefficient] created by the first element together with the shape or profile of the rear of the vehicle. Placing the Maggiolina backwards created a roof shape much like an aircraft wing that is designed to minimize drag [turbulence] when passing through the air. Thus without significantly increasing the frontal area, the goal was to significantly reduce the drag coefficient thereby improving fuel consumption
I tested this theory and found that it actually worked. Prior to building the unit on the back, and with the old bed on the back I drove across country from Ohio to California and back. My average fuel consumption was 15 mpg traveling at about 70 mph.
After I had installed my unit with the “backwards” Maggiolina I drove from Ohio to Arizona but this time towing a 2500 lb. Campa All Terrain Trailer and got the same fuel consumption [15 mpg average] at the same speed. This meant to me that the additional work required by the engine to pull a 2500 lb trailer was negligible but what was the reason?
A few months later I drove out west again, this time without a trailer so was similar to the first occasion and thus I could really compare apples with apples. I averaged a little over 17 mpg at a similar average speed, a significant improvement of 13% in fuel consumption.
I also took the opportunity to weigh my vehicle prior to each trip. On the first trip to California I weighed in at 6400 lbs. On my last trip I weighed in at 7600 lbs. as I was loaded for a two week expedition. The improvement of 13% in fuel consumption in spite of weighing 19% more is most significant. It appears my theory worked. One can actually decrease fuel consumption through minimizing ones drag coefficient by installing a Maggiolina backwards. I doubt any other tent can claim that.
In order to protect the Maggiolina, I built a robust frame from stainless steel square tubing such that the all the sides of the frame would protect the sides of the Maggiolina from damage. I incorporated multiple cross bars not only for added strength as a roll cage but also to offer better support for the Maggiolina. The frame was designed such that the bottom of the frame was at the same height as the top of the cab rear window thus not restricting my rear view.
With the incorporation of a cab roof rack that I had lowered, I had the height of my cab roof rack with the Pelican Case bolted to my roof rack a little higher than my Maggiolina. As such I would strike [and hopefully deflect] any objects with my Pelican Case and prevent damage to the top of my Maggiolina. My integrated roll bar on the vehicle also has the Maggiolina tucked in under it so should I remove my cab roof rack, I still have protection for my Maggiolina.
The other aspect I like about the Maggiolina is its hard shell case. I have had occasion to thoroughly wallop the top of my Maggiolina with no damage at all. I have also had branches scrape down the length of my Maggiolina and been surprised at how the hard shell fiberglass top deflects under the weight of the branch and then pops back to its original shape. Also being familiar with regular roof-top tents, I doubt a canvas cover would have remained intact with that abuse.
I shortened the ladder so that I could stow it under the frame instead of inside the Maggiolina as is customary. Thus I don’t have to clean my ladder in order to prevent soiling my sleeping area and bedding. I also have more storage for soft being in my Maggiolina without the ladder in there. On the one side of the Maggiolina frame I incorporated an awning that I modified to the same length as the Maggiolina roof-rack.
The width of the medium Maggiolina is 57” and the vehicle width is 70”. As such I have 6 ½” clearance from the edge of my vehicle at an approximate height from the ground of 54” at the top of the wheel arch container, to my Maggiolina 24” higher up. In other words I have 6 ½” of clearance over 24” which translates to an angle of approximately 15°. This means if I clear my vehicle passing a tree, one even leaning in towards me a little [by up to 15°] I will clear my Maggiolina too.
Saturday, April 24, 2010
Overland Expo 2010
This is our 'company car' - a 1996 Toyota Landcruiser with many modifications for overland travel.
Wednesday, March 17, 2010
Spring shipment arriving April 17th
Tuesday, March 16, 2010
Water crossing

Long-time Maggiolina owner Bob Bancroft send us a photo of a water crossing in Alaska. Naturally, you should not (cannot?) try this at home...
New Air Top Maggiolina

The new Air Top is a significant advance in design – offering ease of opening, three doors, great interior space, and the durability that owners worldwide have come to expect from the Maggiolina series.
The Air Top has a lift system based on articulated gas rams that eliminates the scissors lift and crank of the standard Maggiolina. This enables easy, rapid set-up and provides 7” more interior space. Other benefits of this new design are; a rear entry door in addition to the two side doors, the huge window opening the front end of the tent, and a new shell design for extra strength. In short, the Air Top incorporates all the comfort and space of the traditional Maggiolina series with a simple, strong, and easy to operate opening system. To open simply remove the safety hooks and the tent opens instantaneously!
The new Air Top incorporates all the great features of the traditional Maggiolina series with even more comfort and space. To open, simply remove the latch straps and the tent opens instantaneously! Extreme Adventure with Extreme Comfort!
Standard Air Top Equipment includes:
● 3 doors - one each side and one in the rear of the tent
● Generous front facing, screened window
● Full mosquito netting and covers against wind or rain
● Two or three foam pillows
● 2 arched windows with mosquito netting for ventilation and reduction of condensation
● arched zips on the windows with rain covers.
● internal elastics straps to help folding of the fabric when closing the tent.
● simple, adjustable Rally-Race style locking straps. (Arnitel EL 550®)
● Spacious roof mounted stowage net.
● 4 Removable Pockets.
● Large internal roof mounted light
● Height adjustable locking aluminium ladder.
Wednesday, December 30, 2009
Fall Shipment Arrives
Monday, November 30, 2009
Fiberglass Care
Tuesday, June 9, 2009
New Maggiolina Changing Room
Thursday, May 7, 2009
Aerodynamics

Friday, March 27, 2009
Attaching an Awning to a Maggiolina
The standard Maggiolina awning works well but I wanted something larger, yeah, really large so I talked to our friends at Mountain Safety Research. Their Outfitter
Wing is huge and fits well with a little adapting. Their new Vista Wing is smaller and may be even better. Here is what it looks like sitting flat. A couple things to note about the shape. First, there are no flat edges, they are all curved. What this does is it allows you to tighten up the whole edge so the awning can handle winds very well without flapping. The other thing to note is one side is relatively straight. This is the side that goes next to the tent . At each point is a pocket, so you can run a ridgepole from pocket to pocket. I add a couple grommets along the edge to tie up the ridgepole. More about this later.Let me show you how the Outfitter Wing looks when
set up on a Maggiolina. The awning is huge so you have lots of protected space under, the sides can go to the ground so it will act as a simple side tent if needed. I build a ridgepole that is adjustable in length. The Outfitter Wing is so large that the relatively straight side is longer than the Maggiolina. If you want the ridgepole to sit under the driprail, then you can then shorten it, hence the need for the extra grommets and lines to tie to the ridgepole. This picture shows the ridgepole tucked in under the driprail so you have a nice watertight seal between the tent and awning. When it gets really nasty, it is wise to have the awning tied up to the vehicle as well as to the tent. The tent to awning connection is strong but the awning is so large conditions can overwhelm the connection.
Here are some details on how the connection works. This is an old retrofit we used to do on the old Maggiolinas and will work on new ones too. We make up two long loops out of 1/8 inch braided rope with two small plates attached so you can loop aroung the ridgepole, more on this later. If you look closely at the picture of the Maggiolina, you can see a the loops in place halfway between the doorway and the front and back.

This cutaway drawing shows how the loops are fitted. You can see one of the secrets why the Maggiolina works so well. The fabric isn't attached to the roof directly but is attached to an inner flange. This is why the tent is so well sealed when closed. The loops fit between the fabric and the flange. There is a piece of soft aluminum that the fabric is wrapped around for reinforcement and then riveted to the flange. You need to bend this open slightly and slide the plate through the opening.
Here is a detail showing placement of the loop and plate. Sitting inside the doorway, you reach up and over toward the front and back of the tent. Slide and flip the fabric above the joint down. This will allow you to see the opening and be able to slide one of the plates through the opening to the outside.I like to put a toggle at the end, the type that are used for cinching up the opening in packs and parkas. REI always has a few in stock. This makes it really simple to tighten up the loops. Put the ridgepole through the loops, tighten the loops using the toggles, that simple. If you are using the awning as sun protection, keep the loops a little loose and have the ridgepole go from pocket to pocket, for maximimum size. If the wind picks up or you want protection from rain then shorten the ridgepole so it will tuck in under the roof's lip. This also allows you to give the awning added support, the straight side is now longer than the ridgepole. Attach lines to the ends and tie to the tent or rack for more protection from the wind.
This same concept can be used to attach other awning systems or side tents to the Maggiolina. One thing to keep in mind, even though the Maggiolina is really strong, awning have a lot of sail area, it is a good idea to take down the awning in high winds.
Friday, March 20, 2009
New shipment arriving!
Thursday, March 19, 2009
Making an interior storage shelf for the Columbus...
The forward end of the Columbus provides an excellent location for a convenient rigid accessory shelf. This design, submitted by Wade Holguin, leverages the two inside vertical lift struts and locking screws as anchor points and spans the inside width of the tent. This accessory shelf requires only seconds to setup. It is constructed using common hardware store materials, and can be stored inside the tent when closed.This handy shelf is simple to construct with basic tools and weighs only 3 lbs. The shelf is very useful for storage of shoes, flashlight, water/beverage container, or other small items. The use of the shelf concept assumes, of course, that occupants sleep with feet towards the hinged end, and allows ample room for stretching out.
Although the following materials list and instructions are optimized for a medium size Columbus tent the simple concept should be adaptable to both large and small sizes as well.
Note many design variances are possible so feel free to get creative anywhere you deem useful. Enjoy your Columbus more by building a simple shelf to hold your stuff!

Materials:
Quantity and Item
2 J Bolt ¼ x 4” (opening must be at least 5/8” or the loop of the bolt will not easily seat over the strut lock inside the tent). Be sure bolt has threads nearly all the way up the long side.
1 ¼” birch plywood or similar cut to 47” x 9” (for a medium size Columbus) and finished as desired
3 90 degree aluminum angle (offset) 1/16” thick, - ¾” x 48”
2 Patio door latches for sliding glass door - this type has a sliding pin that engages a hole to lock
7 #8-32 x ½” machine screws, star washers, and nuts (I used acorn/cap nuts)
5 #8-32 x ½” pan head bolts, washers, star washers, and nuts (I used acorn/cap nuts)
2 ¼”-20 washers, lock washers, and nuts (I used acorn/cap nuts)
Basic Instructions:
1) Cut each of the 3 pieces of aluminum angle to 47”. Slightly under size is OK so ends don’t protrude beyond the ends of the shelf and snag the inside of the tent. Remove any burrs and round the corners slightly with a mill file.
2) Using 3 machine screws (w/countersunk heads), star washers, and nuts, secure one piece of aluminum angle to the “center” of the shelf across its entire length (see Fig B & C). This will provide additional strength and prevent flexing. Put one screw in the center then two additional screws spaced apart from each side of center sufficient to secure the angle. Note there will be two additional screws (J bolts) one at each end of the angle (1/2” in from each end) in a subsequent step so you may want to account for equal spacing of 5 screws total. I found that I did not need to drill countersunk holes – simply tightening up the nuts on the bottom side was sufficient to pull down the machine screw flush with the shelf top.
3) Measure in ½” from each end of the shelf along the center line where you installed the angle strip and drill a hole large enough to accommodate each of the 2 J hooks. Install the bolts with the J loop at the top of the shelf pointed towards what will become the back of the shelf (Fig B). Critical for the opening between the J hook and shelf to be 1-1/4” to allow sufficient space to slip each hook over the round strut thumb screw shafts inside the tent. Once you secure the bolt to the underside of the shelf cut off any remaining length.


4) At this point you should have one angle attached to the center underside of the shelf spanning the entire length with the J hooks in place. Test fit the shelf in the tent (Fig F & H).
5) Attach another piece of angle to the shelf front using 5 machine screws, star washers, and nuts (Fig D). This provides a stop lip to keep things from rolling off the shelf plus gives it some rigidity and strength. I found that the top of the screws countersunk themselves flush with the top as I tightened up the nuts on the underside.
6) Repeat step 5 for the back of the shelf but arrange the angle so that the lip is on the underside of the shelf and the longer part of the L shape is on top and flat (Fig H). This adds rigidity and strength but keeps the lip from interfering with things like shoes and other items you store on the shelf. Use 5 pan head screws, flat washers, star washers, and nuts to secure.
7) At this point the shelf is nearly ready so be sure you have a nice fit inside the tent before you proceed to install the 2 patio door latches and drill into each tent strut. Note: if you do not want to drill into the struts (it won’t hurt anything if you only go past the outside first layer of the strut and DO NOT PENETRATE THE INTERAL PART WHICH MOVES AND IS ATTACHED TO THE TENT ROOF) you can mount the latches so that when extended they simply serve as stops against the struts to keep the shelf from tipping forward or backward.
8) PROCEED VERY CAREFULLY AT YOUR OWN RISK WITH THIS STEP. MEASURE SEVERAL TIMES BEFORE YOU DRILL INTO THE TENT STRUTS OR YOU MAY END UP NEEDING NEW ONES. THIS MAY VOID YOUR TENT WARRANTY. For this step placement of the 2 latches, one on each end of the shelf underside, is somewhat critical as you will be drilling one hole into each strut for the latch to penetrate (Fig E & G). I suggest positioning the shelf, leveling it, then hold the latch on the underside and adjust its position to where you think it needs to be secured to the shelf. Be sure to extend and retract the latch several times until you have the spacing right. It won’t be able to go very far inside the strut so keep this in mind. Once you think you have the latch position on the shelf correct drill two holes and use 2 machine screws, star washers, and nuts to secure each latch to opposite ends of the shelf. When you are happy with the placement of the latches then you can extend them until they touch the struts, mark your holes, and drill them out CAREFULLY using a bit size that will accommodate the latch pin.

At this point the shelf is complete and will easily store inside the tent even with the J hooks attached if you just cover them with bedding or similar material for padding. Enjoy!